
|
|
|
|
|
|

|
Features |
||
|


Introduction
Some times there is a need of remote controlling electrical devices through local network or Internet. This circuit comes to cover that need.
This circuit was initially designed to remote turn on or turn off the central heating system of a building and simultaneously provides the temperature and humidity values of the room where this circuit is installed. Of course it can be used in a lot of applications such as remote reboot computers, electrical water pumps, lighting control and many more.
Moreover, the circuit has a feedback switch, isolated with an optocoupler (5V - 12V DC input) for protecting the Arduino pin from possible sensor overvoltage. This switch input connector can be connected to the 'fault' output of your remote device to inform you when a 'fault' occurs on your remote device.
Remember! The voltage applied on 'Switch input' can be from 5V DC to 12V DC.

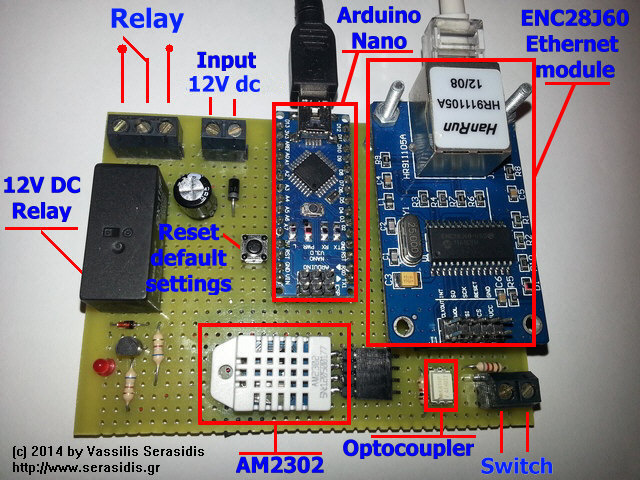
Schematic of Network relay
Change IP address and port:
- Open the NetworkRelay2_enc28j60.ino sketch to the line IPAddress ip(192, 168, 1, 240) and change the IP according to your local network. Program the Arduino with the sketch.
- (Optional) The port can be changed from the line #define ETHERNET_PORT 10000. Change the port 10000 with the port number you want.
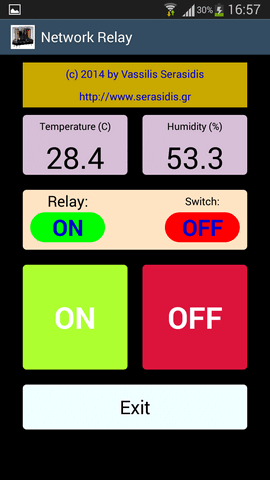
Settings:
-
Network relay software on your android device, go to Settings and set the IP and the port used from Network relay hardware and click OK (Default 192.168.1.240 and port 10000).The software will automatically try to connect on hardware.
-
On software main screeen click on ON-OFF buttons and give the password. If password is ok the buttons will be unlocked and you can turn on or turn off the remote device.
-
On the same screen, there is a switch indication. If the switch is pressed on the hardware side
(CN1) then the indicator will change its color from RED to GREEN with text indication 'ON' instead of 'OFF' it was before. If you release the switch, the color will be back in RED with text indication 'OFF'. There is a delay of 3 seconds to the android software side becase android software request the relay and switch status every 3 seconds. -
You can change the default password (1234) from 'change password' menu. Give the previous password (the initial password is '1234'), the new password and the verification of the new password. If the new password matches the verification password, the software will send the password change request to the hardware. The hardware will check if the old password is correct and save the new password in internal EEPROM.
-
There is a '
Demonstration of the Network relay (720p)
|
|
v1.01 You can download the Arduino sketch, schematic and pictures of Network relay from here. |

Download the android application Network relay from Google play or by scanning the above QR Code image.
-
Reference:
Created and published by Vassilis Serasidis on 10 September 2014
blog comments powered by Disqus